


Welcome! I'm thrilled to have you join me on this creative journey, and I'm confident you'll find joy in the upcoming lesson. Here, we'll delve into the fundamentals of my creative process, exploring techniques such as transferring drawings to pastel paper, discovering the tools I swear by, mastering the art of crafting celestial clouds, and seamlessly integrating pastel pencils into your work.
The first video, conveniently condensed into a one-hour edit, showcases the highlights of the lesson. I've strategically fast-forwarded certain sections while ensuring a detailed explanation of each step. If you're hungry for more and prefer a deeper dive, scroll down to find the extended version.
Get ready to immerse yourself in the world of creativity – enjoy the journey!
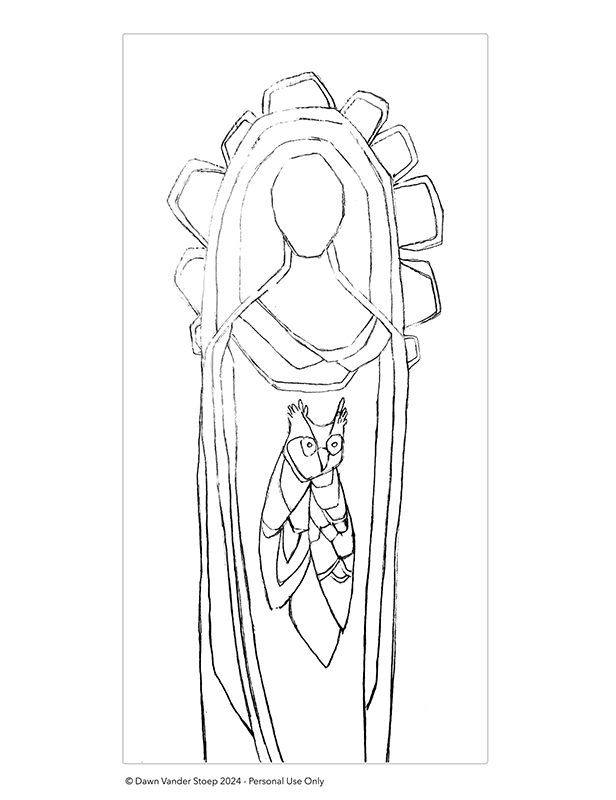
Finished Line Art
This is set up to print on 8.5 x 11 for your convenience.
SUPPLY LIST
UART Sanded Pastel Paper - 600 Grade/Grit DARK - 5x10
I have used many pastel papers, and I have discovered that sanded pastel paper makes a huge difference in what kind of experience you will have with the medium. It allows a lot of layering, and you can erase it without damaging the paper. In addition, the sanded paper grips onto the medium, and you do not need to seal or use fixative on your artwork. Please note there are several different grades of the UART sanded paper… the 600 is the one I recommend because it doesn’t damage the Sofft Tools. Using a different grade and other pastel papers can affect your experience with the medium.
If you can’t find the UART brand what is most important is that it is a sanded fine grade pastel paper. Another brand is Clairefontaine Pastelmat . An alternative option is preparing a black surface using a pastel ground/clear gesso (you will not get the same details if using the other papers)
If you are unable to purchase all of the PanPastel colors I've suggested below. Here are the class's pure core colors (marked in bold). You will need to add white to create the tints and add black to create the shades and extra darks.
Orange Shade (Orange)
Burnt Sienna Shade (Burnt Sienna)
Burnt Sienna Extra Dark
Raw Umber
Raw Umber Extra Dark
Raw Umber Tint
Black
White
Neutral Grey Shade
Wolff Carbon Pencil - 2B This pencil has more “staying power” than a regular pastel pencil. I explain more about it in the lesson.
Pan Pastel Sofft Tools
Sofft Applicators (my favorite)
Sofft Angle Slice, Oval Art Sponge (Used When Making Transfer Paper)
Stabilo/CabOthello Pastel Pencils I started with the full set. They are a wonderful core set. Highly pigmented and a medium softness.
700, 100, 750, 221
Townsend Artists' Ultra Blue/Black 54D Soft Form Stick Pastel (optional)
This is to achieve an extra dark black in my pieces.
White Eraser
My favorite are called Acurit Vanish Four In One Eraser
These Look Similar Pentel Hi-Polymer Erasers
Mobius & Ruppert Brass Round Pencil Sharpener (M&R)
M&R Sharpener Replacement Blades
Artist Tape 3/4”White or Black
Tracing Paper I use Strathmore
Wood Dowel
3/4” x 19” I use this for stabilizing my hand on the easel while painting. They can be found at your local craft/hobby/hardware store.
Mechanical Pencil .5
Extended Version: Inner Wisdom
Below is the full two hour lesson. It is mostly real time and very little speeding up.
Part 1 - Inner Wisdom (Extended Version)
Part 2 - Inner Wisdom (Extended Version)
Part 3 - Inner Wisdom (Extended Version)
Part 4 - Inner Wisdom (Extended Version)
Part 5 - Inner Wisdom (Extended Version)